Sunday, September 21, 2014

Marshmallow Smiles

There's always a lot of things to smile about, the start of fall, good health, great friends, and family.  So say cheeeeeeese because it's time to make Marshmallow Smiles!  These "bite sized" (pun intended!) smiles are perfect appetizers for a Halloween party or afternoon snack!  They're easy to make, delicious to eat, and fun to pose with!  I'll tell you how to make them step by step.

Ingredients

Apples

Peanut Butter

Mini marshmallows

Instructions
1. Slice the apples into four quarters then make sure to cut off the seeds from the quarters so they will look like this:

2. Cut those quarters each into two or three smaller slices.  Keep in mind that they should resemble lips so they should be thinly cut.

3. Spread peanut butter onto each small slice.


4.  Place about 5 mini marshmallows on top of the peanut butter spread, then place another slice on top of the marshmallows to make the smile.

Share these pearly whites with your friends and bring a plateful of them to a party!  The guests will love them and they'll get right into the spooky Halloween spirit.  

These are so easy to make and kids will love helping out!  You can just cut the apple slices for them and let them spread the peanut butter and add the marshmallows, and they'll be delighted to participate in this fun craft.  My niece and nephew loved putting these together and eating them as well.  It's a great snack, and is healthier than most with fruit and peanut butter!  :)


Enjoy and snap a photo with your new teeth!! 

Friday, September 12, 2014

Grilled Banana Splits


I looked into my cabinets today after my 10 mile run (woo hoo!) and realized I had bananas, chocolate chips, peanut butter, and marshmallows, so I decided to combine them all together and try a new treat.  Introducing...Grilled Banana Splits!  

It was such a great treat with the perfect consistency!  After baked, the marshmallows became a crunchy consistency.  Imagine that with a smooth and creamy chocolate and peanut butter taste, all on top of a grilled mushy banana.  I loved the marshmallow crunch.  The banana tasted very similar to a fried plantain once grilled.  This snack takes 2 minutes to prepare, 8 minutes to cook, so in 10 minutes you have a quick, easy, and relatively healthy snack with a sweet twist!  Once you've got one serving of your fruit intake for the day dressed with peanut butter, you can treat yourself to some marshmallows and chocolate chips as well! 

Don't worry, I'll teach you how to make them, they're so easy!  Here's what you need to know:

Ingredients

Bananas

Chocolate Chips

Peanut Butter

Mini marshmallows

Instructions

1. Preheat oven to 400 degrees

2. Peel banana, place it on a piece of tin foil, and cut it in half like this:

2.  With a knife, spread peanut butter on each half of the banana

3.  Sprinkle chocolate chips on top of the peanut butter, than top it all off with mini marshmallows.  It will look like this:


4.  Once oven is preheated, put the banana split in the oven for 7-8 minutes or until marshmallows are golden brown

This treat is easy to make for a quick snack for you or your kids, and kids would love making this as well!  You could also make modifications by adding peanut butter chips or removing the peanut butter.  Pretty much adding anything you'd like would taste great.

Once you take the banana split out of the oven, immediately get a fork and dig in!  Enjoy!


Tuesday, August 26, 2014

Good Humor Birthday Cake Pops

Happy Summer!  Boy, I haven't blogged in awhile, but it's good to be back!  No better way to cool down on a hot summer day than to enjoy an ice pop!  But not just any ice pop, a Good Humor Birthday Cake popsicle is the way to go!  


If you've read my blog, you know I love everything funfetti flavored.  Vanilla cake with sprinkles that explode once baked are truly amazing.  I love cake batter, funfetti, sprinkles, and vanilla, and when you put them all together, your taste buds rejoice.  


I just recently tried the Good Humor Birthday Cake pops and loved them.  They were made of vanilla ice cream, vanilla cake, and crunchy colorful sprinkles.  They tasted and looked like fruity pebbles.  The moist center with the outside crunch was a great texture and mix.  I literally devoured my pop in one minute it was so good.  They're easy to eat, don't get all sticky or melty, or at least mine didn't because I ate it so fast.  They're fun to look at too, I love bright colors and sprinkles so of course I posed with my pop!  


Try them out before summer's over, Labor Day is right around the corner!  Happy, happy, summer!  


Sunday, May 18, 2014

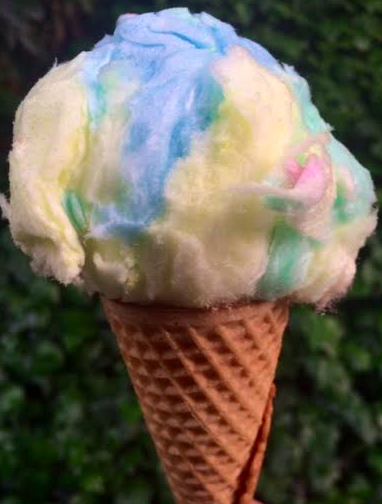
Cotton Candy Cones

Summer is almost here!  It's been super hot these last few weeks so basically spring has sprung and summer has arrived!  For a fun summer treat, how about making Cotton Candy Cones?  Forget the mess and super stickiness of ice cream and make some Cotton Candy Cones for your next event or birthday party.  Everyone will love this cone alternative!

What you'll need:

Bagged cotton candy (or fresh cotton candy if you live near a boardwalk!)

Ice cream cones

Instructions:

1.  Take cones and cotton candy out of packaging


2.  Take a baseball sized scoop of cotton candy and roll it into a ball shape
3.  Stuff cotton candy inside cone and on top
4.  Share and consume!

Fun and creative recipes don't get any easier than this!  This is a perfect 2 minute candy craft to do with kids.  They'll love the new and fun cone alternative.  It's bound to make everyone smile!  Who doesn't like rainbow cotton candy on a cone?  I know I do!

Enjoy!!

Wednesday, April 23, 2014

Strawberry Shortcake


Strawberry shortcake huckleberry pie, the letter you land on will be your guy!  Anyone remember that rhyme?  I remember singing that while jump roping when I was little and having the best time!  And you'll have the best time making and eating your own semi-homemade Strawberry Shortcake!  I'll tell you everything you need to know to wow your guests after dinner!

Ingredients
Freshly picked strawberries
2 cups heavy cream
2 oz sugar
1 dash vanilla
Pound cake

Instructions
1.  Homemade whipped cream -- this part only takes 5 short minutes.  Just add the heavy cream, sugar, and vanilla into a mixer and whip for about 5 minutes until nice and fluffy.

2.  Strawberries - cut stems off of strawberries and put in a bowl.  Then add a dash of sugar and mix together to make the strawberries extra sweet!

3.  Pound cake -- Make your own from scratch or take the easy way out and buy store bought pre sliced pound cake.  It tastes delicious and is a good shortcut!

4.  Place pound cake on a plate, place a few scoops of strawberries on top of the pound cake, then top with the homemade whipped cream.

5.  Enjoy!

Your guests will love this extremely easy and absolutely divine dessert.  It's a great summer treat or good for anytime of the year because who doesn't love eating Strawberry Shortcake!?  Happy Spring!

Monday, March 31, 2014

Candy Bird Nests


Happy Spring!  The beginning of Spring means that Easter is approaching fast!  Easter is always a great family holiday filled with good company, good spirits, and good candy.  For this upcoming Easter, I wanted to try making a new creation that I've never tried before.  So today, I'll be giving you the step by step for how to make Candy Bird Nests!  Chirp chirp!

Here's what you need:

Rice Krispies

Rolos

Waffle Pretzels

M&Ms

Here's what you do:

1. Preheat oven to 350 degrees
2. Place pretzels on cookie sheet
3. Unwrap Rolos
4. Place Rolos on top of each waffle pretzel
5. Bake for 3-5 minutes until Rolos are semi melted
6. Remove from oven and using a spoon, flatten the Rolos on top of the pretzels
7. Immediately sprinkle Rice Krispies on top of Rolos before they harden
8. Place three M&Ms on top of the Rice Krispies to resemble bird eggs
9. Let cool in the refrigerator for 30 minutes
10. Admire your candy bird nests, then eat and enjoy! 


These are so easy to make and taste just as good as they look!  It's a perfect quick crowd pleaser.  You must try it!  Have a Happy Easter every bunny!  

Tuesday, March 18, 2014

Chocolate Caramel Creams

Today, I was lucky enough to try my first ever Goetze's Candy, Chocolate Caramel Creams.  I was unfamiliar with the brand and was so up to trying out their sweet products when they reached out to me.  Who could ever turn down trying something new, and obviously we all know that opportunity is even better when it's candy!

I initially thought the Chocolate Caramel Creams were a hard candy.  All in all, I loved the presentation overall, and each of the individually wrapped candies were super cute.  When I got hold of my first piece, I was unsure of what to expect.  As I unwrapped the perfectly presented morsel, and while the candy slipped right out of the wrapper, I noticed a white powdery substance sprinkled on top of the Chocolate Caramel Cream.  I later found out that this coating prevents the chocolate caramel from sticking to the wrapper.  Genius!  

I held the candy in my hand and placed it in my mouth, and to my surprise, I was able to chew it, and it was so good!  As you may know, I'm a sour candy kind of girl and always choose sour over chocolate.  But these Chocolate Caramel Creams were absolutely delicious.  The Chocolate Caramel Creams tasted like a chewy, but not too sticky, fudge Tootsie Roll brownie batter with caramel inside.  It was milky, creamy, smooooth, rich, and chocolatey.  After a few bites, your tastebuds think that you're drinking chocolate milk because it's so smooth, juicy, and filled with cream.  

I'd eat these any day of the week.  If you haven't tried these, you definitely should.  Thanks to my friends at Goetze's Candy for sending me a little taste of Heaven!